

Table of Contents
ToggleEmpty walls don’t just look unfinished, they waste an opportunity to inject personality, depth, and visual interest into a room. Small wall decor offers a practical solution that’s easier to install than large-scale art, more affordable to experiment with, and perfect for renters or anyone hesitant about committing drill holes to drywall. Unlike oversized statement pieces that demand a specific aesthetic, smaller decorative elements work in layers, letting homeowners build a look gradually without hiring an interior designer or risking costly mistakes. This guide covers what types of small wall decor deliver the best impact, where to hang them for maximum effect, and how to create custom pieces that fit any style.
Key Takeaways
- Small wall decor offers a flexible, affordable, and renter-friendly alternative to large statement pieces, allowing you to experiment with design without costly mistakes or permanent wall damage.
- Layering multiple smaller framed prints, mirrors, and shelves creates visual depth and curated appeal that single oversized artwork cannot achieve.
- Proper placement using the 57–60-inch eye-level rule, gallery wall layouts, and strategic spacing (2–3 inches between pieces) maximizes the visual impact of small wall decor.
- DIY small wall decor projects like fabric-wrapped panels, painted geometric canvases, and wood slice art can be completed in a weekend for $5–$15 per piece.
- Use appropriate mounting hardware rated for at least 10 pounds for decorative mirrors and shelves, and always locate studs for heavier installations to ensure safety and durability.
Why Small Wall Decor Is the Secret to Stylish Spaces
Small wall decor succeeds where larger pieces often fail: it’s flexible, forgiving, and easier to rearrange as tastes or layouts change. A 12×16-inch framed print can hang on a single drywall anchor rated for 20 pounds, while a gallery wall of smaller frames distributes weight across multiple studs, reducing the risk of wall damage. Renters especially benefit from this approach, since patching a few small nail holes at move-out is far simpler than repairing the damage from a heavy mirror or shelving unit.
Layering smaller pieces also creates depth that single large artworks can’t match. Three or four 8×10-inch prints arranged asymmetrically draw the eye in multiple directions, making a wall feel curated rather than bare. This technique works particularly well in transitional spaces like hallways, stairwells, or above console tables where a single large piece might overwhelm the proportions.
Another advantage: cost and commitment. Experimenting with a $30 print in a simple frame carries far less risk than investing in a $500 canvas. Homeowners can test color palettes, swap seasonal themes, or rotate pieces between rooms without the sunk-cost guilt that comes with expensive statement art. When trends shift or tastes evolve, small decor adapts, large pieces often end up in storage.
Best Types of Small Wall Decor for Every Style
Framed Art and Prints
Framed art remains the workhorse of small wall decor. Standard sizes like 8×10 inches, 11×14 inches, and 12×16 inches fit pre-made frames from most home goods stores, keeping costs down and installation straightforward. For a cohesive look, stick to matching frame finishes, black metal for modern spaces, natural wood for farmhouse or Scandinavian styles, ornate gold or silver for traditional interiors.
Matting matters more than most DIYers realize. A 1.5- to 2-inch mat around an 8×10 print elevates it from dorm-room poster to gallery-worthy art, creating visual breathing room and protecting the print from touching the glass. Acid-free mats prevent yellowing over time, especially important for photographs or watercolor prints.
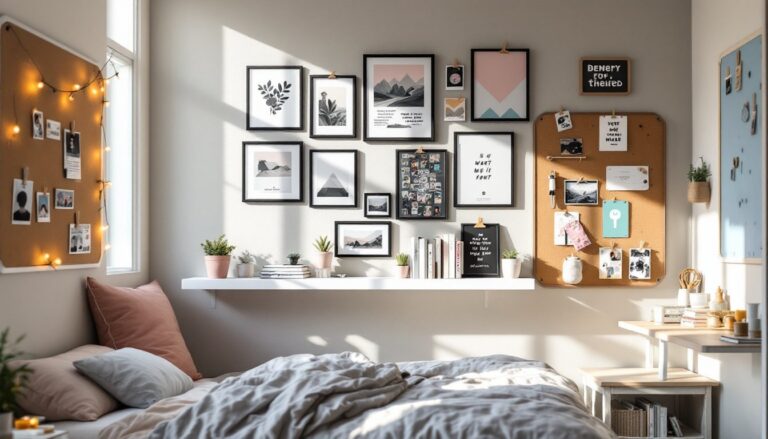
Consider mixing mediums within a gallery wall: combine photography, line drawings, and watercolor prints to add textural variety. Botanical prints work in kitchens and bathrooms, abstract geometrics suit modern living rooms, and vintage maps or architectural drawings complement home offices. Many decorative layouts incorporate varied frame sizes for a collected-over-time look rather than a matching set.
Decorative Mirrors and Shelving
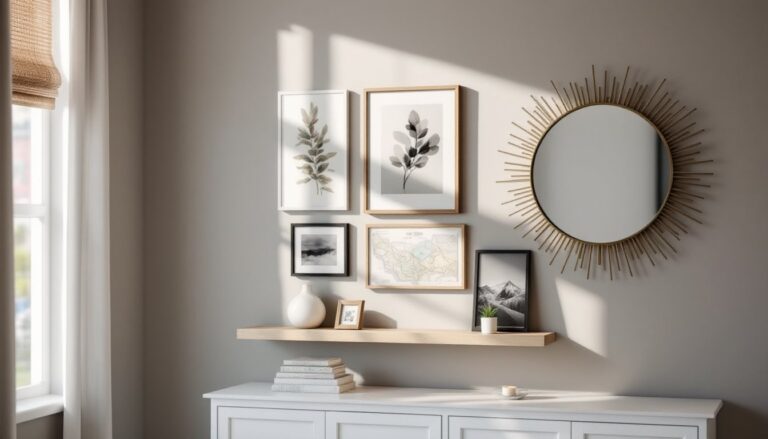
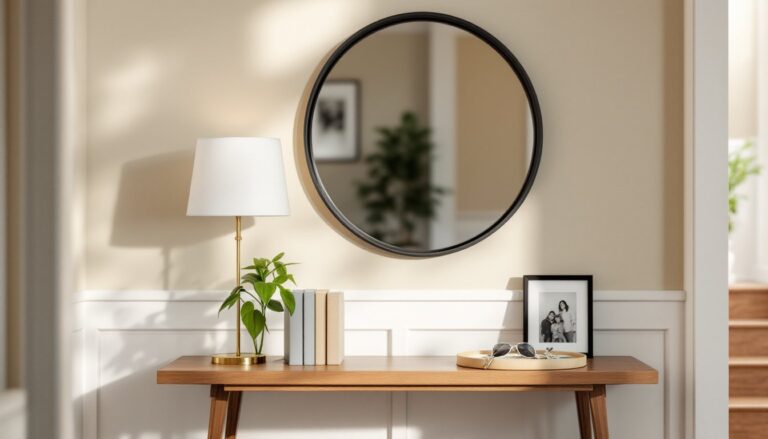
Small decorative mirrors, anywhere from 10 to 18 inches in diameter, do double duty by reflecting light and making tight spaces feel larger. Round mirrors soften angular rooms, while rectangular or hexagonal shapes reinforce geometric design schemes. Hang a cluster of three small circular mirrors in varying sizes for an organic, sculptural effect, or use a single 16-inch sunburst mirror as a focal point above a credenza.
Mirror weight requires attention to mounting hardware. A 12-inch round mirror typically weighs 3 to 5 pounds: use wall anchors rated for at least 10 pounds to account for dynamic load (the force when bumped or adjusted). For mirrors heavier than 10 pounds, locate studs with a stud finder and use wood screws driven at least 1.25 inches into the framing.
Floating shelves in the 12- to 24-inch range serve as both decor and functional storage. A single 18-inch shelf can display a small plant, a candle, and a 5×7 frame without looking cluttered. Install shelves at varying heights, stagger them by 10 to 14 inches vertically, to create visual rhythm. Ensure brackets are anchored into studs or use toggle bolts rated for the shelf’s load capacity plus at least 50% more to accommodate books or heavier decorative objects.
When considering broader wall decor ideas, think about how small mirrors and shelving integrate with other elements like prints or textile hangings to build a layered, lived-in look.
Creative Placement Ideas to Maximize Visual Interest
Placement transforms ordinary decor into a deliberate design move. The 57- to 60-inch rule, hanging art so its center sits at average eye level, applies to small pieces in high-traffic areas like entryways and living rooms. In dining rooms or spaces where people are seated, drop that center point to 52 to 54 inches to maintain visual connection.
Gallery walls let homeowners combine multiple small pieces into a unified composition. Start by laying out frames on the floor, spacing them 2 to 3 inches apart, then photograph the arrangement before transferring to the wall. Use painter’s tape to mark frame positions on the wall, double-checking alignment with a laser level or a traditional bubble level. For a cohesive grid, align tops or bottoms of frames: for a salon-style hang, vary heights but maintain consistent spacing.
Narrow vertical spaces, like the wall beside a doorframe or between two windows, benefit from stacked arrangements. Hang two or three 8×10 frames vertically, spaced 4 to 6 inches apart, to draw the eye upward and make ceilings feel higher. This trick works especially well in rooms with low ceilings or heavy furniture.
Don’t ignore corners. A small shelf or a pair of framed prints installed on adjacent walls at a 90-degree angle activates dead space and softens the hard lines of the corner itself. This approach suits accent walls that extend onto perpendicular surfaces, tying color or pattern around the room.
Above furniture, leave 6 to 8 inches of clearance between the top of a sofa, console, or headboard and the bottom of the frame. For narrow console tables (12 to 16 inches deep), a single small piece or a pair of 8×10 frames works better than a sprawling gallery wall that overwhelms the furniture below.
DIY Small Wall Decor Projects You Can Make This Weekend
Fabric-Wrapped Panels: Cut 1/2-inch plywood or 1/4-inch MDF into 12×12-inch or 10×14-inch rectangles using a circular saw or have a home center make the cuts. Stretch fabric, canvas, linen, or even a bold print, over the panel, wrapping edges to the back and securing with a staple gun (use 5/16-inch staples for 1/2-inch material). Hang with sawtooth picture hangers or adhesive Command strips rated for the panel’s weight. This project costs $10 to $15 per panel and takes about 30 minutes each.
Floating Frame Botanicals: Press leaves, ferns, or flowers between pages of a heavy book for one to two weeks until fully dried. Sandwich the dried botanical between two sheets of glass from a floating frame kit (available in 5×7- or 8×10-inch sizes). These frames hold materials without a backing, creating a light, airy look perfect for kitchens or bathrooms. Many craft projects follow similar preservation techniques for long-lasting results.
Wood Slice Wall Art: Slice a 3- to 4-inch diameter branch into 1/2-inch-thick rounds using a miter saw (wear safety goggles and a dust mask). Sand edges with 120-grit sandpaper, then arrange slices in a honeycomb or organic cluster pattern on a painted wood backing board. Attach with wood glue and finish with a coat of polyurethane for durability. Mount the backing board with D-rings and drywall anchors. This rustic approach suits farmhouse and cabin interiors.
Painted Geometric Canvases: Use pre-stretched 8×10- or 11×14-inch canvases and painter’s tape to mask off geometric shapes, triangles, chevrons, or color blocks. Apply acrylic paint in two to three coats, letting each dry fully (typically 30 to 60 minutes). Peel tape while the final coat is slightly tacky for clean lines. Pair three or four canvases with a unified color palette for a modern, high-impact display. Total cost runs $5 to $8 per canvas.
Shadow Box Displays: Arrange small three-dimensional objects, vintage keys, seashells, or antique hardware, inside a shadow box frame (1.5 to 3 inches deep). Secure items with hot glue or small nails driven through the backing board. Shadow boxes add tactile depth that flat art can’t provide, and they’re ideal for showcasing collections without taking up shelf space. Many modern decor ideas feature shadow boxes as sculptural elements in minimalist settings.
Conclusion
Small wall decor punches above its weight class, delivering style, flexibility, and affordability without the commitment or risk of larger installations. Whether layering framed prints into a gallery wall, hanging a cluster of decorative mirrors to reflect light, or building custom fabric panels on a Saturday afternoon, these projects let homeowners refine their spaces incrementally. Start with one or two pieces, test placement with painter’s tape before drilling, and don’t be afraid to rearrange as the room evolves.